Chords for My Home Studio Tour in 2015
Tempo:
121.8 bpm
Chords used:
Bb
B
Ab
Bm
Eb
Tuning:Standard Tuning (EADGBE)Capo:+0fret
Start Jamming...
Hi, this is Walter Rodriguez.
[N] Today I'm going to be doing something a little different.
I'll [Bm] be giving you an overview of how I record my videos for YouTube.
[E] I've been receiving many questions on that particular subject,
so I decided to put this video together in order [Em] to answer those questions.
And at the same time, I hope [Ab] this can [B] benefit you at some level.
So let's get started.
Thank you so much [Eb] for watching, and I hope you enjoy it.
The [B] first thing I want to cover is this black [C] background that you see behind my back.
It looks like it's an infinite [A] black background,
and the [G] way you achieve it is by using a technique called a three-way lighting.
It's a very simple concept, and all you need are three [Eb] clamp lights,
one on each side, and another one [B] above your head.
A little bit actually behind you, but it must be [Bb] above your head.
And a [E] black curtain, [Bb] those regular black [B] panel curtains, but they must be very straight.
Also, the farther that you are from the curtain, the easier it is to get the effect.
I do my videos in a very small room, so I cannot be too far from the curtain.
I'm about, I think, maybe three feet away from the curtain.
Now I'm going to open [Bb] my window here so you can actually see the room and how I do the setup.
Now that's where I sit.
I'm behind the camera now.
And those are three black curtain [N] panels.
So there's one lamp hanging on the ceiling right there,
and there's another lamp right here on this side,
and [Bb] on that side [N] there's another lamp.
Now from my chair, there's one lamp there to my left.
There's the tripod where the camera goes.
And another lamp right there, and one above my head right here.
This is a regular clamp light.
I got it at Home Depot, I think for about $8 or $9 each.
And I clamp it on a regular microphone stand.
So I had two spare microphone stands.
[Eb] I'm using one on each side of the [Ab] room.
[N] And the lamp that I, I mean the bulb that I use is a 40 watt bulb, 450 [Dbm] lumens.
Okay, now I cover the clamp lights with wax [Dbm] paper so [G] it softens a little bit the light.
[Bb]
And I think it helps to [B] kind of diffuse a little bit [Bb] the light.
I mean, I'm not an expert on light, but it does help a lot.
So that's basically what it is.
And the one above my head that I showed you, exactly the same.
It's a one, two, [Bm] and three.
That's all you need.
[Gb] As far as positioning the [G] lights, I have them at about [Db] [E] 45 degree.
[Bm] And they are at approximately five or six feet away from me.
[C] So 45 degree, and the one on the ceiling, [Bm] it's about one foot behind my back [C] and hanging on the ceiling.
So you have to play [Bm] around.
It depends on [E]
how big your room is.
This is a fairly small [Bm] room, so I can't get too far from the curtain.
Now, when I'm recording acoustically, either [Bb] the acoustic steel string or my nylon classical guitar,
I use two small diaphragm microphones.
[F] And the way I position them is about [C] six to seven inches away [Bb] from the guitar.
One of them is pointing [Ab] towards the 12th to the 14th fret in this area.
[C] [Bb] And the other one is pointing towards the bridge.
You want to stay away from the sound hole as much as you can.
[Ab]
[Bm] These [Eb] two microphones, [Db] they are very inexpensive and they do the job [A] very, very well.
These are Behringers.
[Bb] The model is C2.
And I think they cost around $55 to $60, the pair.
It's very inexpensive.
I've done some blind tests with them and it's amazing.
[Ab] They really do the trick.
So you want to check them out.
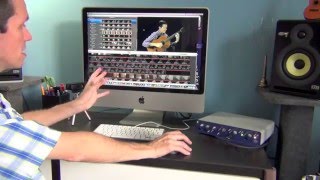
[F] So now from here, [Bb] the signal goes to my audio interface and then to the computer, which I'm going to show you now.
And of course, if I'm recording either the electric guitar or my other guitar, the nylon that has the pickup,
I just run the cord straight to the audio interface.
[Ab] The audio interface that I use is [N] an M-Box 2 Pro.
It's an old interface.
[Abm] But it's FireWire and it goes from here, I go [Bb] to an external hard drive and then to the computer.
So everything that [B] I record goes straight to [Ab] the hard drive.
For the software, [A] I use a Pro Tools [Ab] LE8, which is also an old version.
[C] And then after I [G]
mix everything, after the mix is [F] done, [B] by mix I [A] mean I add some reverb and [Bm] a little EQ.
I import it into iMovie as well as the footage from the camera.
Then I do the video editing and I sync the audio and it's done.
Then you export the file [Bb] and then I upload it [Ab] to YouTube.
That's pretty much it.
[Bb]
Just a few more things that [Eb] I want to mention that [B] helped a lot with the sound in the room to make it quieter.
Behind the curtain there's a door.
Let me show you.
Here's [Gb] the door.
[C] What I did is I [B] used those self-adhesive weather strips.
I just put it all [E] the way around the door.
And at the bottom I [Eb] have this tube.
[D] It's like a foam [Ebm] tube [Db] and it comes pre [A]-cut.
You just open it and you slide it [D] underneath the door.
Thanks [B] so much for watching and I hope you enjoyed it.
[Gm] [Gb] [F] [Cm]
[D] [G] [Eb]
[Cm]
[N] Today I'm going to be doing something a little different.
I'll [Bm] be giving you an overview of how I record my videos for YouTube.
[E] I've been receiving many questions on that particular subject,
so I decided to put this video together in order [Em] to answer those questions.
And at the same time, I hope [Ab] this can [B] benefit you at some level.
So let's get started.
Thank you so much [Eb] for watching, and I hope you enjoy it.
The [B] first thing I want to cover is this black [C] background that you see behind my back.
It looks like it's an infinite [A] black background,
and the [G] way you achieve it is by using a technique called a three-way lighting.
It's a very simple concept, and all you need are three [Eb] clamp lights,
one on each side, and another one [B] above your head.
A little bit actually behind you, but it must be [Bb] above your head.
And a [E] black curtain, [Bb] those regular black [B] panel curtains, but they must be very straight.
Also, the farther that you are from the curtain, the easier it is to get the effect.
I do my videos in a very small room, so I cannot be too far from the curtain.
I'm about, I think, maybe three feet away from the curtain.
Now I'm going to open [Bb] my window here so you can actually see the room and how I do the setup.
Now that's where I sit.
I'm behind the camera now.
And those are three black curtain [N] panels.
So there's one lamp hanging on the ceiling right there,
and there's another lamp right here on this side,
and [Bb] on that side [N] there's another lamp.
Now from my chair, there's one lamp there to my left.
There's the tripod where the camera goes.
And another lamp right there, and one above my head right here.
This is a regular clamp light.
I got it at Home Depot, I think for about $8 or $9 each.
And I clamp it on a regular microphone stand.
So I had two spare microphone stands.
[Eb] I'm using one on each side of the [Ab] room.
[N] And the lamp that I, I mean the bulb that I use is a 40 watt bulb, 450 [Dbm] lumens.
Okay, now I cover the clamp lights with wax [Dbm] paper so [G] it softens a little bit the light.
[Bb]
And I think it helps to [B] kind of diffuse a little bit [Bb] the light.
I mean, I'm not an expert on light, but it does help a lot.
So that's basically what it is.
And the one above my head that I showed you, exactly the same.
It's a one, two, [Bm] and three.
That's all you need.
[Gb] As far as positioning the [G] lights, I have them at about [Db] [E] 45 degree.
[Bm] And they are at approximately five or six feet away from me.
[C] So 45 degree, and the one on the ceiling, [Bm] it's about one foot behind my back [C] and hanging on the ceiling.
So you have to play [Bm] around.
It depends on [E]
how big your room is.
This is a fairly small [Bm] room, so I can't get too far from the curtain.
Now, when I'm recording acoustically, either [Bb] the acoustic steel string or my nylon classical guitar,
I use two small diaphragm microphones.
[F] And the way I position them is about [C] six to seven inches away [Bb] from the guitar.
One of them is pointing [Ab] towards the 12th to the 14th fret in this area.
[C] [Bb] And the other one is pointing towards the bridge.
You want to stay away from the sound hole as much as you can.
[Ab]
[Bm] These [Eb] two microphones, [Db] they are very inexpensive and they do the job [A] very, very well.
These are Behringers.
[Bb] The model is C2.
And I think they cost around $55 to $60, the pair.
It's very inexpensive.
I've done some blind tests with them and it's amazing.
[Ab] They really do the trick.
So you want to check them out.
[F] So now from here, [Bb] the signal goes to my audio interface and then to the computer, which I'm going to show you now.
And of course, if I'm recording either the electric guitar or my other guitar, the nylon that has the pickup,
I just run the cord straight to the audio interface.
[Ab] The audio interface that I use is [N] an M-Box 2 Pro.
It's an old interface.
[Abm] But it's FireWire and it goes from here, I go [Bb] to an external hard drive and then to the computer.
So everything that [B] I record goes straight to [Ab] the hard drive.
For the software, [A] I use a Pro Tools [Ab] LE8, which is also an old version.
[C] And then after I [G]
mix everything, after the mix is [F] done, [B] by mix I [A] mean I add some reverb and [Bm] a little EQ.
I import it into iMovie as well as the footage from the camera.
Then I do the video editing and I sync the audio and it's done.
Then you export the file [Bb] and then I upload it [Ab] to YouTube.
That's pretty much it.
[Bb]
Just a few more things that [Eb] I want to mention that [B] helped a lot with the sound in the room to make it quieter.
Behind the curtain there's a door.
Let me show you.
Here's [Gb] the door.
[C] What I did is I [B] used those self-adhesive weather strips.
I just put it all [E] the way around the door.
And at the bottom I [Eb] have this tube.
[D] It's like a foam [Ebm] tube [Db] and it comes pre [A]-cut.
You just open it and you slide it [D] underneath the door.
Thanks [B] so much for watching and I hope you enjoyed it.
[Gm] [Gb] [F] [Cm]
[D] [G] [Eb]
[Cm]
Key:
Bb
B
Ab
Bm
Eb
Bb
B
Ab
Hi, this is Walter Rodriguez.
[N] Today I'm going to be doing something a little different.
I'll [Bm] be giving you an overview of how I record my videos for YouTube.
[E] I've been receiving many questions on that particular subject,
so I decided to put this video together _ in order [Em] to answer those questions.
And at the same time, I hope [Ab] this can [B] benefit you at some level.
So let's get started.
Thank you so much [Eb] for watching, and I hope you enjoy it.
The [B] first thing I want to cover is this black [C] background that you see behind my back.
It looks like it's an infinite [A] black background,
_ and the [G] way you achieve it is by using a technique called a three-way lighting.
It's a very simple concept, and all you need are three _ [Eb] clamp lights,
_ one on each side, and another one [B] above your head.
A little bit actually behind you, but it must be [Bb] above your head.
_ And a [E] black curtain, [Bb] those regular black [B] panel curtains, but they must be very straight.
Also, the farther that you are from the curtain, the easier it is to get the effect.
I do my videos in a very small room, so I cannot be too far from the curtain.
I'm about, I think, maybe three feet away from the curtain.
Now I'm going to open _ [Bb] my window here so you can actually see the room and how I do the setup.
_ Now that's where I sit. _
_ _ I'm behind the camera now.
And those are three black curtain [N] panels. _
So there's one lamp hanging on the ceiling right there,
_ and there's another lamp _ right here on this side, _ _
and [Bb] on that side [N] there's another lamp.
_ Now from my chair, _ there's one lamp there to my left.
There's the tripod where the camera goes.
_ And another lamp right there, _ and one above my head _ right here. _ _ _ _ _ _
_ _ _ _ _ _ _ _
This is a regular clamp light.
I got it at Home Depot, I think for about $8 or $9 each.
And I clamp it on a regular microphone stand.
So I had two spare microphone stands.
[Eb] I'm using one on each side of the [Ab] room.
[N] And the lamp that I, I mean the bulb that I use is a 40 watt bulb, 450 _ [Dbm] lumens.
_ _ _ Okay, now I cover the clamp lights with wax [Dbm] paper _ so _ _ _ [G] it softens a little bit the _ _ light.
[Bb] _ _
_ _ And I think it helps to [B] kind of diffuse a little bit [Bb] the light.
I mean, I'm not an expert _ _ on light, but it does help a lot.
So _ that's basically what it is.
And the one above my head that I showed you, exactly the same.
It's a one, two, [Bm] and three.
That's all you need.
[Gb] As far as positioning the [G] lights, I have them at about [Db] [E] 45 degree.
[Bm] _ And they are at approximately five or six feet away from me.
[C] So 45 degree, and the one on the ceiling, [Bm] it's about one foot behind my back [C] and hanging on the ceiling.
So you have to play [Bm] around.
It depends on [E]
how big your room is.
This is a fairly small [Bm] room, so I can't get too far from the curtain. _
_ Now, when I'm recording acoustically, either _ [Bb] the acoustic steel string or my nylon classical guitar,
I use two small diaphragm microphones.
[F] And the way I position them is about [C] six to seven inches away [Bb] from the guitar.
One of them is pointing [Ab] towards the 12th to the 14th fret in this area.
[C] _ [Bb] And the other one is pointing towards the bridge.
You want to stay away from the sound hole as much as you can.
[Ab] _
_ [Bm] These [Eb] two microphones, [Db] they are very inexpensive _ and they do the job [A] very, very well.
_ These are Behringers.
[Bb] The model is C2.
_ _ And I think they cost around $55 to $60, the pair.
It's _ very inexpensive.
I've done some blind tests with them and it's amazing.
[Ab] They really do the trick.
_ _ So you want to check them out.
[F] So now from here, [Bb] the signal goes to my audio interface and then to the computer, which I'm going to show you now.
And of course, if I'm recording either the electric guitar or my other guitar, the nylon that has the pickup,
I just run the cord straight to the audio interface.
_ _ [Ab] The audio interface that I use is [N] an M-Box 2 Pro.
It's an old _ interface.
[Abm] But it's FireWire and it goes from here, I go [Bb] to an external hard drive and then to the computer.
So everything that [B] I record goes straight to [Ab] the hard drive. _
_ For the software, [A] I use a Pro Tools [Ab] _ LE8, which is also an old version.
_ _ [C] And then after I [G]
mix everything, after the mix is [F] done, _ _ _ [B] by mix I [A] mean I add some reverb and [Bm] a little EQ. _
I import it into iMovie as well as the footage from the camera.
Then I do the video editing and I sync the audio _ and it's done.
Then you export the file [Bb] and then I upload it _ [Ab] to YouTube.
_ That's pretty much it.
[Bb] _
_ Just a few more things that [Eb] I want to mention that [B] helped a lot with the sound in the room to make it quieter.
Behind the curtain there's a door.
Let me show you.
Here's [Gb] the door.
[C] What I did is I [B] used those self-adhesive _ weather strips.
I just put it all [E] the way around the door.
And at the bottom I [Eb] have this tube.
[D] It's like a foam [Ebm] tube [Db] and it comes pre [A]-cut.
You just open it and you slide it [D] underneath the door.
Thanks [B] so much for watching and I hope you enjoyed it. _
[Gm] _ _ _ [Gb] _ _ [F] _ _ [Cm] _
_ _ [D] _ _ [G] _ _ [Eb] _ _
[Cm] _ _ _ _ _ _ _ _